
Hi and welcome to my blog
I am sharing a tutorial I did for Off The Rails Scrapbooking. You can check out that post here.
This is the card I made for my Mum for her 85th birthday on Christmas Eve.

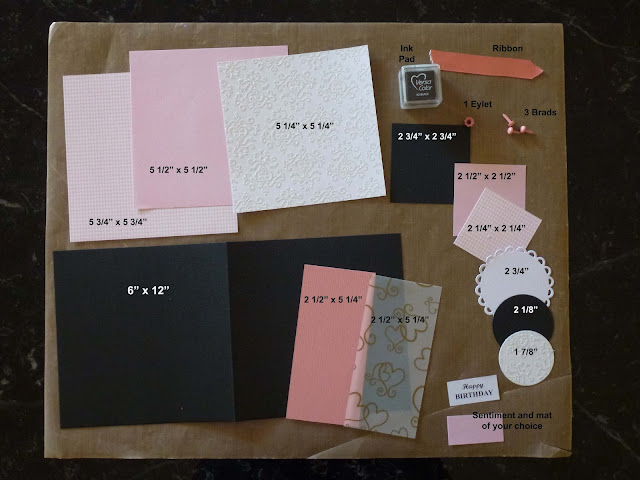
This is what you are going to need to create this card
Score and fold the black cardstock at 6" to make a 6" x 6" card base
Using the 5 1/4" x 2 1/2" pieces of cardstock and velum, mark down from the top 1/2" and in from the sides 1/2" and cut the corners off to make a tag shape.
Attach the velum to the cardstock. I used glue behind the pattern on the velum to do this so it would not show through the velum

Ink the edges of all your papers.
Using your Crop-o-dile, or similar, attach your eyelet to the tag.
Thread the ribbon through and secure in place. I have used a staple because my ribbon was very short but you could tie it off if you have longer ribbon.

Attach the 5 1/2" piece of cardstock centrally to the 5 3/4" piece of patterned paper
Then attach the 5 1/4" piece of patterned paper on top of the 5 1/2" piece

Using the square pieces of paper, attach the 2 1/2" piece centrally on top of the 2 3/4" piece and the 2 1/4" piece on top of that.

Layer the scalloped circle and the circles as shown

Assemble your greeting. I have made my greeting mat 1/4" wider and longer than the greeting

These are the items you should now have.

Attach the tag to the larges square assembly 1/2" from the left hand edge and 1/2" from the bottom edge.
I found that I had to use glue to do this as the d/s tape did not want to stick to the glittered paper I had used.

Take the small square assembly and run it through your Big Shot (or similar) with an embossing folded to add a little bit of dimension.

Attach this to your card panel 1 1/2" from bottom and 7/8" from right hand edge

Attach the circle assembly 3/4" from the bottom and 1 1/4" from the left edge using foam tape.

Attach sentiment in a suitable place according to your sentiment size. I have stuck mine 1 3/8" from the bottom and 1 1/2" from the right hand edge.

Add brads to the top right hand corner approx 1/2" apart.
Attach the card panel to the card base and you are done.
If you used a dark colour for your card base you may want to add a light coloured card to the inside of the card so you can write your message. I will write my message using a white gel pen.

Hope you have found this tutorial interesting and I would love to see your makes if you decide to give it a try
Till next time
Hugs
Julie
I am sharing a tutorial I did for Off The Rails Scrapbooking. You can check out that post here.
This is the card I made for my Mum for her 85th birthday on Christmas Eve.

This is what you are going to need to create this card

Score and fold the black cardstock at 6" to make a 6" x 6" card base
Using the 5 1/4" x 2 1/2" pieces of cardstock and velum, mark down from the top 1/2" and in from the sides 1/2" and cut the corners off to make a tag shape.
Attach the velum to the cardstock. I used glue behind the pattern on the velum to do this so it would not show through the velum

Ink the edges of all your papers.
Using your Crop-o-dile, or similar, attach your eyelet to the tag.
Thread the ribbon through and secure in place. I have used a staple because my ribbon was very short but you could tie it off if you have longer ribbon.

Attach the 5 1/2" piece of cardstock centrally to the 5 3/4" piece of patterned paper
Then attach the 5 1/4" piece of patterned paper on top of the 5 1/2" piece

Using the square pieces of paper, attach the 2 1/2" piece centrally on top of the 2 3/4" piece and the 2 1/4" piece on top of that.

Layer the scalloped circle and the circles as shown

Assemble your greeting. I have made my greeting mat 1/4" wider and longer than the greeting

These are the items you should now have.

Attach the tag to the larges square assembly 1/2" from the left hand edge and 1/2" from the bottom edge.
I found that I had to use glue to do this as the d/s tape did not want to stick to the glittered paper I had used.

Take the small square assembly and run it through your Big Shot (or similar) with an embossing folded to add a little bit of dimension.

Attach this to your card panel 1 1/2" from bottom and 7/8" from right hand edge

Attach the circle assembly 3/4" from the bottom and 1 1/4" from the left edge using foam tape.

Attach sentiment in a suitable place according to your sentiment size. I have stuck mine 1 3/8" from the bottom and 1 1/2" from the right hand edge.

Add brads to the top right hand corner approx 1/2" apart.
Attach the card panel to the card base and you are done.
If you used a dark colour for your card base you may want to add a light coloured card to the inside of the card so you can write your message. I will write my message using a white gel pen.

Hope you have found this tutorial interesting and I would love to see your makes if you decide to give it a try
Till next time
Hugs
Julie
No comments:
Post a Comment
Thank you for your comment